Showing posts with label Lasercutter. Show all posts

Wednesday, 9 November 2022

Tutorial Monday7th November: mysterious machines


This is the frame for "Me Story" - not the actual name, but a working title. I haven't made enough bits or done them correctly, but it will do for now.

This is one of the things that I showed N. Kidd in our tutorial today. I think it's safe to say that she wasn't as impressed as I was with the product or the project. This is always a bit worrying, especially when a previous tutorial with a different tutor has been very positive. 

But it gives you food for thought and after all that's the point of these sessions. Also I was very tired for this session so I'm not sure if I articulated what I was hoping to do as clearly as I could have done. Still Natasha gave me some interesting stuff to reflect on: "What was/is the story?", "How will people encounter this - where will it be situated - who is my audience?", "How will people encounter the story (and why should they care?)?", "Is it fact or fiction?". All of these are valid and indeed pertinent questions to ask. The biggest one, and one that I can't think my way out of at the moment is "Why should they care?". I don't know. Quite possibly it's self indulgent, but then a lot of art is.

The second major area in the critical was looking at my A.I. generated images of arcade machines. Almost every tutor has got excited about the picture of the machine below:


Generated a few weeks ago by Dawn AI, this image is mysterious as there's no obvious function. I'm trying to recall the text I used to generate it, but I fear it's lost forever. Natasha challenged me to come up with an operation and make it. Her parting words:

"You're a tinkerer really"

My Mum used to call be a a tinker. I like that.


Tutorial 8th November


Surprised myself when this photo was first opened. I had forgot that it's on my diary with its multicolour* 'Do sheet' (something I remember from Dixons days). 

This is a Lasercut panel for a coin acceptor. I have used the official product sheet to design the hole and the screw positions. Sadly it doesn't work as there is a very small screw that stops the coin acceptor mechanism being put in. Hence the little pencilled bit.

In the tutorial we discussed this coinbox at length. My impression was that, like an earlier tutorial, the person I'm talking to gets a bit excited about some of the machines - or their potential. I tried to insist that this is a prototype, it's just to get a feel for the mechanisms and to learn to program it. When I've done that, then I'll think about how to deploy it. Nevertheless, there were some intriguing suggestions and some real links with Natasha's tutorial yesterday. (See next post.)

As this was a new tutor, we also discussed things like 'Why are you here?" and my history. I guess that comes with being a bit older. It's a long story, but I try to keep it as short as possible. I don't always succeed...

He's interested in the Machine though. Thinks they offer some possibilities, makes some suggestions that I have heard before: "Simplify" "Show movement" "Less is more". These I should pay attention to, although the temptation is always to make things more complex and detailed. Perhaps I should take some older stuff in?

He also hesitantly asked if "arcade" was a good descriptor, I think imagining I would be upset/disturbed at that. Quite the opposite!

One final note: I did a quick survey today. Out of all the people I asked, none had any coins. That's going to make coin-op tricky!


*Each day is allocated a colour in turn. When I've completed something I colour it in. After a time I can see days that have been productive and days that are not. I can also see things that are being left out. Usually they need breaking down to smaller tasks - or just crossing out. Sounds efficient. Don't be fooled. If I had 'procrastination' and 'indecision' on the list, then I could colour in loads.


Thursday, 2 April 2020

Another 3D pic. With instructions...

I think this version is the best. In the end I did about twenty different versions. There's another one at the end of this. Instructions follow...
So this is about creating the images you see here. The origin of tis one is a practical model I made for another student's show. The box is about 45mm wide, so if you're looking at this on a phone, it's about life size.

Here's how it was done:

Software: Adobe Illustrator, Photoshop. I assume you have some knowledge of these applications.
So, this is the Illustrator file that I got ready for the Lasercutter. There's a bit more, there are just the faces and I didn't use the one bottom right in the end. The missing parts are the sides and the top and bottom.

So, the Laser cutter needs just outlines, no fills. It also doesn't like Illustrator's compound paths or other Postscript trickery, so to prep the file for the Lser cutter I get rid of all of those. Unfortunately, for the 3D image we do need 'real' holes in the illustration, so these have to be put in. What you are looking at here is a yellow layer put behind everything so I can see that these are holes and not just filled with white.
So, the box shapes have been filled with black. (See bottom middle) the whole group have been stroked (outlined) in red so I can see them. I'm then selecting each element in turn and using the Pathfinder to take the small shape from the big shape. This cuts holes in the shapes. An alternative that sometimes works is making the whole thing a Live paint object and filling with nothing. 
Here we are almost all done...
Now the fun begins. I have coloured these 100% RGB Red (255, 0, 0). Then switched to HSB, which allows me desaturate the colour without changing it. You can of course do this other ways. I'm using peak red as this is a colour that disappears nicely on cheap anaglyph glasses. Note; Illustrator works in CMYK by default. Switch the document to RGB!
So, make a copy on another layer and repeat the process. This time we are using Cyan as it is the complimentary to Red. Personally, I think Green works better, but you have to have Red/Green anaglyph glasses and they are harder to find. Cyan has issues- which I might do another blog post on at some time. (Grief this is taking me back to my first trip to art school where I first did experiments in stereoscopy..)  Here's me stroking the paths.
Here's a peek at the Illustrator layers. Doesn't matter much which way around they are.

When you have done this, stack one channel on top of each other, despite this being the red, I stacked the blue because they are harder to see.
Here they are stacked. And HERE IS THE TRICK that will make them three dimensional. The stacks are slightly offset as you can see in this picture. here I've exaggerated the offset. In the working one it was much smaller and I experimented with different settings. I also swapped colours around, altered densities and so on. Probably about twenty experiments in all. But it's the offset that creates the illusion. You should also not that what works nicely at phone size may not work well at desktop or projection.
Once this has been done, open the Illustrator file in Photoshop. I use quite a high resolution, it's easy to downsize if you need to. You can see that Photoshop automatically flattens the file. 

In Photoshop, copy one colour to a layered then align. You will need to experiment with this. Basically where the two layers align completely becomes the screen level. Other layers will appear on top or below this. What I do is just sit and tinker until it looks right.
Very important!! Set the top layer to the Multiply setting in the blend menu in Layers. This simulates overprinting and the effect of transparent ink. Without this, you won't get the effect. Incidentally, you wouldn't do this is you wanted to print the image. This is for screen use.
Here's more-or-less the final version in Photoshop, at least, the technically final version, it's working now. You'll notice that I've swapped the cyan and red around so that it works with the glasses I have; although I could have simply worn the glasses around the other way.
And that's it, just about. Start simple, amuse yourself. Then you can go for more complex stuff.


this is the other version. I think the shaded version works bette, although there's an issue with the blue/cyan colour as the shading is very difficult to see.

Wednesday, 1 April 2020

Forest automata in 3D

Took the original Laser cut outlines, manipulated them and ended up with this 3D image. Very pleased with self. Took about three hours of fiddling but I got there! Since it's now 0130, I'm not going to document the process right now.

You'll need a pair of Red/Cyan anaglyph glasses like these to see it correctly.


Thursday, 23 March 2017

Producing Artwork for the Lasercutter

This is a guide to producing artwork (the type of artwork we are doing) for the Lasercutter. It's not a definitive guide, it's what I found that works and is simple for people to understand and use. I realise that as I write this it may be too simple for some applications. If that's you, please move on.

IMPORTANT: If you find an error, please let me know!!

How it works

You are setting up a file where you want the Lasercutter to carve or cut out shapes.

You are using the Lasercutter because it's:
  • Repeatable
  • Quick
  • Accurate
  • Cuts finer than you can with a Knife.

The Illustration.

Draw the picture. Use any tool you like - Photoshop, Illustrator, black ink on white paper.
In your drawing the white areas are areas that will cut out, the black areas will stay.
When you are drawing, remember that areas of black surrounded by white will fall out, so if they are to stay you will need to provide some support.

Open in Photoshop

Open your image in Photoshop. If it's ink on paper you will need to scan it. If it's Illustrator you can open it directly.

Make sure that it's the size you want and the resolution is at least 300ppi. 1200 will be too much.


In Photoshop, max the contrast so it's just black and white.
Notice I've checked the "Use Legacy" box. This means it will be just black and white.


Convert to greyscale. This last step may not be necessary - you are aiming for pure black and white and it may help.


In photoshop examine the image carefully. Iron out any bumps and clean up any stray pixels. 

Photoshop is the easiest place to do this.


Save your file as PSD.

Open Illustrator

Create a new file the correct finished size. 


Place the Photoshop file


Select Window > Image Trace


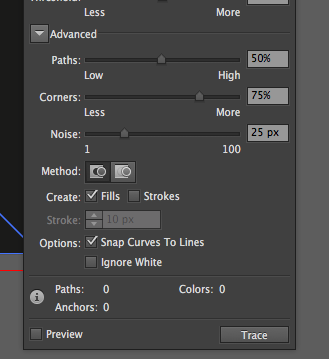
The Image trace window appears.


Click on "Advanced"


Click "Ignore white"


Make sure Preview is selected

View the image on the screen while you adjust the sliders. You are aiming for the smallest number of corners and paths that will still give you the image you require.

When you are happy, close the trace image window.


Select the traced image (if it's not already selected).

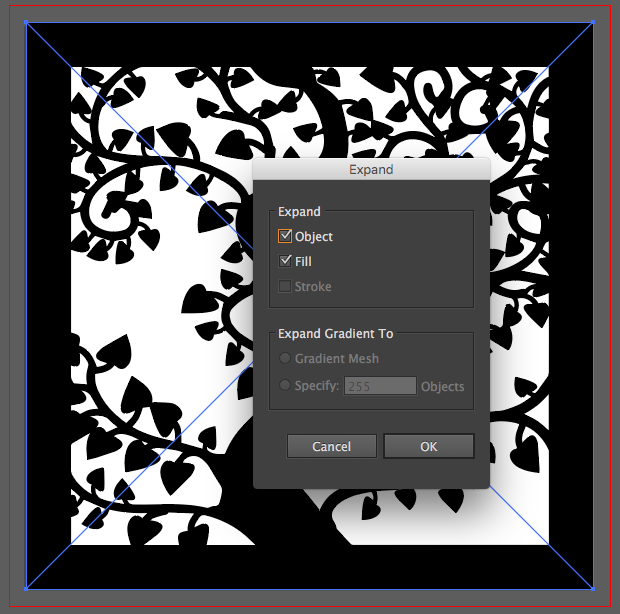
Select Expand.


Check the image by going to View > Outlines.

You should have clear paths. That is where the cutter will cut.


Choose export to DXF. Use the older settings (Our Lasercutter software doesn't understand the newer DXF settings from Illustrator.)


That's it!