Showing posts with label bath college. Show all posts

Wednesday, 10 April 2019

Unlocking Christmas 2017 (Partially)

Got asked who was who in the 2017 Christmas card, and took a booking 2019! Here's part of the image. I lost the list that identified many, but here are the people I work with section identified.


  1. Lou R
  2. Jo S
  3. Tom G
  4. Nick B
  5. Tobie L
  6. Jon D
  7. Ed P
  8. Jo D
  9. Scarlett, Sofie and Arran.


Friday, 5 April 2019

Lesson Plans

Have taken to putting lesson plans into decorative graphics and then putting on the screen for the lesson. Reminds me, reminds them.
Here's some:


Thursday, 20 December 2018

Print conundrum and smooth running...


Been trying to help with a print job. Author has had all sorts of issues. One thing that rand an alarm bell was finding out that the author needed to edit a PDF. 
Noooooo....

This isn't good. I know you can (After all I did the Adobe exam in PDF many years ago) but really PDF is a delivery medium. Not a work in progress file. They are designed to be bolted down. Attempts to do big edits is nearly always bad voodoo.

Suggested workflow

This is the kind of workflow you need. Basically, it's your text > InDesign >PDF. Consider each of the ">" as a one-way street.

In more detail:

  1. Your manuscript. Completely finished and proofread, any graphics either scanned properly or to be created. Once you’ve passed it over, I wouldn’t expect anything other than very minor tweaks to the copy. You need/should not do any formatting other than very basic forms such as Chapter heads, subheads, lists, footnotes. If you are doing an index that will be done after formatting. Page numbers/folios will be added automatically, Contents, footnotes will be positioned and generated automatically.
  2. I would take your text file and images (if any) and would do a quick and dirty format to judge length etc. I would properly format a chapter and send that back to you as a pdf for checking approval of layout style, fonts, sizes, etc.
  3. Then make tweaks as required. 
  4. Once approved the remaining sections of the book would be formatted - each chapter, if it suited the book, would be sent for proofing individually.
  5. Once whole book approved, print-ready PDF would be generated. 
Printing the book.
Then I looked around for some low-run print prices. As usual huge variation, from around £3.50 a copy to over £8. Same product, same quantity, same spec. 
I only half understand why this is. I assume that expensive printer may be subcontracting to cheap. Or quality may be different, or expensive printer deals with people who need a lot of hand-holding while cheap printer just talks print speak. But it's still a huge difference.

Thursday, 23 March 2017

Producing Artwork for the Lasercutter

This is a guide to producing artwork (the type of artwork we are doing) for the Lasercutter. It's not a definitive guide, it's what I found that works and is simple for people to understand and use. I realise that as I write this it may be too simple for some applications. If that's you, please move on.

IMPORTANT: If you find an error, please let me know!!

How it works

You are setting up a file where you want the Lasercutter to carve or cut out shapes.

You are using the Lasercutter because it's:
  • Repeatable
  • Quick
  • Accurate
  • Cuts finer than you can with a Knife.

The Illustration.

Draw the picture. Use any tool you like - Photoshop, Illustrator, black ink on white paper.
In your drawing the white areas are areas that will cut out, the black areas will stay.
When you are drawing, remember that areas of black surrounded by white will fall out, so if they are to stay you will need to provide some support.

Open in Photoshop

Open your image in Photoshop. If it's ink on paper you will need to scan it. If it's Illustrator you can open it directly.

Make sure that it's the size you want and the resolution is at least 300ppi. 1200 will be too much.


In Photoshop, max the contrast so it's just black and white.
Notice I've checked the "Use Legacy" box. This means it will be just black and white.


Convert to greyscale. This last step may not be necessary - you are aiming for pure black and white and it may help.


In photoshop examine the image carefully. Iron out any bumps and clean up any stray pixels. 

Photoshop is the easiest place to do this.


Save your file as PSD.

Open Illustrator

Create a new file the correct finished size. 


Place the Photoshop file


Select Window > Image Trace


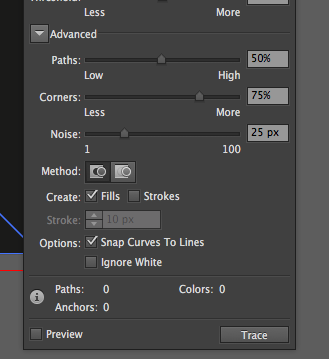
The Image trace window appears.


Click on "Advanced"


Click "Ignore white"


Make sure Preview is selected

View the image on the screen while you adjust the sliders. You are aiming for the smallest number of corners and paths that will still give you the image you require.

When you are happy, close the trace image window.


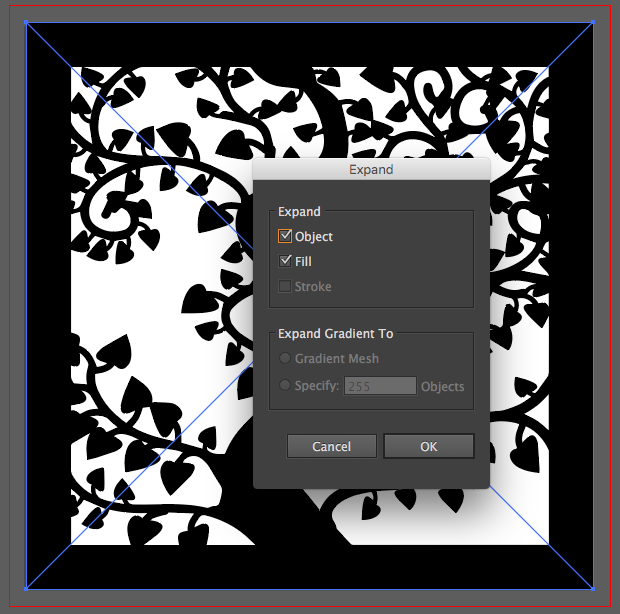
Select the traced image (if it's not already selected).

Select Expand.


Check the image by going to View > Outlines.

You should have clear paths. That is where the cutter will cut.


Choose export to DXF. Use the older settings (Our Lasercutter software doesn't understand the newer DXF settings from Illustrator.)


That's it!

Tuesday, 7 March 2017

Trying to get the class to communicate with Emoji.


 Getting my class to start to thing about drawing emoji made my, the first one most of them did was and I probably looked a bit  But then when they had tried again it was  and I gave them an encouraging . I suspect after teaching today I will end up