Showing posts with label retro. Show all posts

Tuesday, 26 May 2015

Experimenting with type.

 This is the finished product. If you're quick they will be around the streets of Bath over the next few days. It's a flyer for Bedlam Fair, which is a celebration of street theatre.
I wanted a slightly home=brewed retro look to the product. Initially I was going to propose using Letterpress or Risograph printing rather than offset/digital, but in the end this didn't happen because everything began running late. I did start to to a Linocut version of a map of Bath but this this was abandoned because it's almost impossible to update. (Although actually drawing the route on each of the flyers did also occur.
In the end I used a Photoshop Plug-in to give some of the images - notably the map and the Bedlam Fair masthead a retro look. This plug in replicates the look of cheap printing and provides a large number of controls to make the fakery look realistic. Of course, for the proper effect I would have had to use it on the whole publication, which was probably going to be unacceptable, so I didn't.

 This is a shot of the inside. here you can see the final layouts and colours.

Choosing Type
To achieve the look, whilst retaining the part of the brief that says "simple and easy to read" required some experimentation, testing and repeating the exercise and drilling down until a combination had been found. Of course, this is how I choose type - it's a long-winded process if I do it properly, but if it's for a series of similar products then if I get it right I can avoid having to re-do it every time a job comes along.
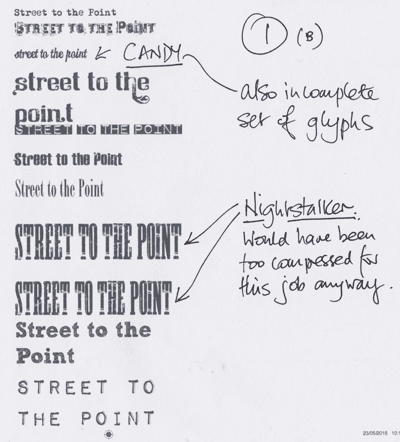
 For this job I basically need two or three typefaces: 
  • A display face for the main titles, and possibly another for subheadings.
  • A body type. I've already decided that I want a typewriter face for the body type - so the first job is to try a number. 
Must have tried around 50 display faces - the picture here is just a sub-set. Of the ones I liked, three were protected, meaning they couldn't be embedded into a pdf, which makes them useless. Nights taker was far too compressed for the size I wanted anyway. Candy turned out to be trial. Nice fnt, but quite expensive for just a few lines and the 'free' version I have has a very incomplete glyph set.
The same was true for "Mother Typewriter" and I noticed looking at the paragraphs of body type that I had the same face with three different names.

Here you can se some of the typewriter faces. Traveling Typewriter soon becomes the front runner. Not too grungy, has pretty complete glyph set. My other favourite, 1942 Typewriter,   has incomplete glyphs and doesn't work well at smaller sizes.
So here's a sheet of trials mixing up body and display. The Dymo like font has gone in and out of favour. I'm warming to it because it gives a fairly solid bar of colours. Useful for separating out sections.

Sketch Rockwell/Block (Name depends on where you get it from. - see this post) is liked by nearly all testers; but eventually dropped as it doesn't play well when used small. It also takes up a lot of space.
 More test, this time beginning develop and use colours. I've invented four, later six colours.

They are called:

  • Mucky Cyan: c90/m0/y20/k10
  • Mucky Magenta: c10/m90/y0/k10
  • Mucky Yellow: c20/m10/y75/k0
  • Flat Black: c20/m20/y10/k80


Later I added:

  • Dirty Red: c0/m90/y90/k10
  • Grubby Green: c50/m0/y75/10
These colours are desinged to simulate a poorly maintained press colours with loads of cross-conyamination. Additionally, as you can see from the front cover, I also simulated mis-registration. (bet this is going to make a printer look twice).
As you can see from the sheet here, at the end of this iteration one body style and one headline style were eliminated.

 This is the black version to check legibility
Here  you can see mucky Cyan working with a distressed display font. I quite like this, as do the testers, except for the spacing between the lowercase n and t. This face however is soon eliminated as it turns out we only have lower case and that is incomplete. Should have checked earlier!
One particular concern is how these work at smaller sizes. This test leads onto a later test, but already the writing is on the wall for some fonts.
Really like the effect of the Dymo lettering font in colour. Think it works well. But it's eliminated as too many heading will have to go onto two lines, or it will be too small to be read easily.
 Final two sheets of experiments. Been about three hours now - maybe longer if you count lunch and passing them around the table.
we have too winners; Veneer and Traveling Typewriter, The fancy type face that is the runner up will be saved for some heading (it was dropped in the end) the green became blue/cyan because that worked better.
If you enlarge this page you can see my notes as they were being passed around about the various typefaces.

Incidentally, I think it's pretty important, if this is going to be print, that these are printed out and looked at on paper. Most ink jet printers now give you a good idea of what's going on.

And finally, here's a rough of the layout, printed out and marked up for Saturday/Sunday.

Saturday, 18 April 2015

Designing the Ghost House

In the posting I did about the doll's house that we are building I mused about whether or not it could be automated to give the appearance of people or things living inside it.

Since then I thought a bit more and I think it's entirely practical that such a thing could be done and the diagram here gives an idea or two.

First up is using puppets - or automata - to give some motion to it. The mechanism can be hidden in the roof or floor - depending if they work by string or wire. Here you can see a ghost coming down through the floor and another skull making the same trip. Although these are shown using cranks, intact I'd probably use small servos or stepper motors to allow them two be moved individually. While the romance of brass cams and steampunk mechanisms appeals, using electronics gives more control and would allow interaction between the ghosts and the viewer in a less predictable way.

The last ghost, sitting bottom right in a chair is a variation on pepper's ghost a victorian illusion that I keep find now days being referred to as a 'hologram'  - it's not. It's a simple partial reflection that unless done live isn't even stereoscopic. In the use of the effect above, the originating image is a LCD screen built into the floor. You can see the reflective glass at 45 degrees and the ghost will apparently sit on the chair or move around.

I don't suppose I will ever build this, at least not in this form; but it was a good think through and design.I also quite liked the drawing that I did - at the moment I'm still into grunge and imperfection in a big way.

SS April 2015

Monday, 6 April 2015

Starting the guide...

So this is the third year that I've designed the contents of the Bath Fringe Festival guide. I thought, especially for the benefit of some of my students you might like to see how I do these things. I'm not saying it's the best way, and I expect there will be many trials on the way.

For a reminder this is what last year's cover looked like - I didn't do this it was a student from Bath Spa University, I did the contents.


To make the cover design feel like it belonged with the rest of the publication, I spent and hour or two dropping ink onto paper until I got some nice blobs. These were then scanned, covered to 2-bit graphics and colourised in InDesign. They used a Multiply blend so that you could see through them to what was underneath and so that the colours mixed on the pages


Incidentally, all these pictures are quick screen shots I did while working on the 2015 guide. That's why you can see the construction lines and guides.


Here's a spread from the finished 2014 guide. Makes use of cutouts and text wraps to add interest. Also angled text. Challenge is to make this year's different enough. Quite happy with the blobs although they did get a lot of remarks. Curiously, this year's cover (2015) which I'm not going to show until it's published - also features blobs. But I'm definitely not going to use them again!


This is the FAB (Fringe Arts Bath) side of the A3 flyer, It's a pretty formal layout that contrasts well with...


...the rear, which is designed to have a 'home-brew' look about it. This year I'm trying to think of better, out-of-the-box print solutions for this. I guess in the end time and money will decide.


Thursday, 30 September 2010

The Violet Ray Machine


This is the Violet ray Machine. It was originally made in the 1920's and this one comes with two probe. A standard mushroom probe, and a probe to comb through your hair. 

I have no idea if this works, right now it definitely doesn't because the wires going in and out of the box are badly frayed. However one that has been corrected, and I'm brave enough to connect it to the mains current; it still may not work. Insulation may have broken down, internal cables may have corroded, capacitors which are made with waxed paper may have shorted. Or of course, the probes may have leaked.

The thing is basically a high voltage generator - like a car ignition - with a spark gap to excite it. In this case the spark gap works (I assume) at mains frequency. The probes are probably just partial vacuums - but there may be some gas like argon or neon in there to glow.

Overall I would expect the effect to be similar to a plasma ball, and despite the huge medical and spirital claims made for these things over the years, just as about useless.

But pretty.