Thursday, 23 March 2017

Producing Artwork for the Lasercutter

This is a guide to producing artwork (the type of artwork we are doing) for the Lasercutter. It's not a definitive guide, it's what I found that works and is simple for people to understand and use. I realise that as I write this it may be too simple for some applications. If that's you, please move on.

IMPORTANT: If you find an error, please let me know!!

How it works

You are setting up a file where you want the Lasercutter to carve or cut out shapes.

You are using the Lasercutter because it's:
  • Repeatable
  • Quick
  • Accurate
  • Cuts finer than you can with a Knife.

The Illustration.

Draw the picture. Use any tool you like - Photoshop, Illustrator, black ink on white paper.
In your drawing the white areas are areas that will cut out, the black areas will stay.
When you are drawing, remember that areas of black surrounded by white will fall out, so if they are to stay you will need to provide some support.

Open in Photoshop

Open your image in Photoshop. If it's ink on paper you will need to scan it. If it's Illustrator you can open it directly.

Make sure that it's the size you want and the resolution is at least 300ppi. 1200 will be too much.


In Photoshop, max the contrast so it's just black and white.
Notice I've checked the "Use Legacy" box. This means it will be just black and white.


Convert to greyscale. This last step may not be necessary - you are aiming for pure black and white and it may help.


In photoshop examine the image carefully. Iron out any bumps and clean up any stray pixels. 

Photoshop is the easiest place to do this.


Save your file as PSD.

Open Illustrator

Create a new file the correct finished size. 


Place the Photoshop file


Select Window > Image Trace


The Image trace window appears.


Click on "Advanced"


Click "Ignore white"


Make sure Preview is selected

View the image on the screen while you adjust the sliders. You are aiming for the smallest number of corners and paths that will still give you the image you require.

When you are happy, close the trace image window.


Select the traced image (if it's not already selected).

Select Expand.


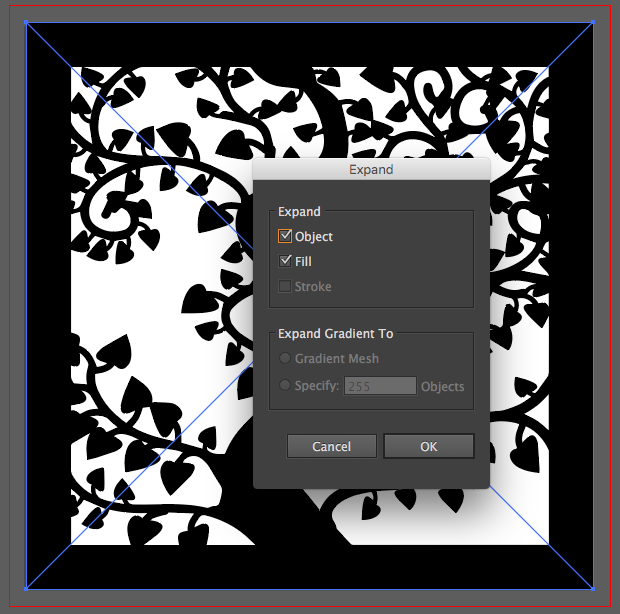
Check the image by going to View > Outlines.

You should have clear paths. That is where the cutter will cut.


Choose export to DXF. Use the older settings (Our Lasercutter software doesn't understand the newer DXF settings from Illustrator.)


That's it!

...And they're off!

Last night was the first proper meeting about the 2017 Fringe Guide. Client wants three columns this year and some more sign posting. We have a very groovy cover, that I can't tell you about at the moment and we have some interesting stuff on.
All of this needs to be completed by 13th of April to get it to print on time. Nice short deadline :-)

Tuesday, 7 March 2017

Trying to get the class to communicate with Emoji.


 Getting my class to start to thing about drawing emoji made my, the first one most of them did was and I probably looked a bit  But then when they had tried again it was  and I gave them an encouraging . I suspect after teaching today I will end up

Saturday, 18 February 2017

Teaching basic animation at Bath College.

New cohort of students. Bless 'em. Showed them some basic animation. Issue is, they all think "That's easy", when in practice it's quite hard to get timing, emotion and storytelling in there.

This is just a silly piece I did while they were working. I have offered it to the Oscars people for their consideration...


Friday, 17 February 2017

Makin' Chickens, part one.

The Farmyard is about farming, in particular caged chickens who have a tough time. This sculpture/sideshow is made to highlight it and contrast their plight with the sanitised version we present to children.

My main resource for factual information on caged birds comes from the RSPCA*.

For this project I'm going to need a large quantity of chickens. I have a few, but buying a lot is going to be expensive. You can buy them as spare parts at about £1 each, but buying a quantity (say 100) is probably difficult.

I might however buy some packets of chicks they are cheap...

What you can see here is the mould being taken from an existing chicken. When I've done both sides I will press mould a whole load of them in Fimo. The red is paint which will hopefully act as a release compound. If they don't work I'll be calling up Playmobil!

I also have to work out how, and if I can articulate them. At the moment fishing line or wire is the favourite, but we'll see. A prototype needs to be made!
https://www.rspca.org.uk/adviceandwelfare/farm/layinghens/keyissues

The Farmyard: go or no go?

This week I have to decide if the Farmyard is go or no go. Will need the next six weeks to get it up and running. If I decide to go ahead, that's will be quite a lot of work. If I decide to drop it, then I might regret it.
This is the base playmobil farm I have been given. (Image from playmobil UK)